The Windows 10 upgrade process drags old files, settings, and programs from your previous Windows system to your new one. Microsoft allows you to get an entirely fresh system by performing a clean install, but the activation process can be a bit confusing.
This is also useful if you’ve purchased a new Windows 10 PC and it includes manufacturer-installed bloatware you don’t want. Or, you may need to perform a clean install on a computer without an existing Windows system after installing a new hard drive.
Note that you won’t be eligible for the free “Windows DVD Player” app offered to users of Windows Media Center if you perform a clean install. However, you can always
Windows 10 allows you to change the lock screen background, but the login screen background always features the default Windows 10 background. Use these tweaks and you can set any image or color you want as the background.
This changes the image that appears on the sign-in screen after you leave your lock screen. On Windows 8 and 8.1, this was just a flat-color background. The trick for changing Windows 7’s login screen background no longer works the same way on Windows 10.
Use a Single Color Instead of an Image
Rather than seeing a background image whenever you type your password, you can choose to disable the login screen background and see a single, flat-color background — just as Windows 8 and 8.1 used. This requires a quick registry tweak.
Download our Disable Logon Background Image on Windows 10 registry hack. Double-click the included “Disable Logon Background Image on Windows 10.reg” file to add the tweak to your registry. We’ve also included a .reg file that will undo the change, if you like — just double-click it.
If you’d like to do it yourself, open the Registry Editor and create a DWORD value named “DisableLogonBackgroundImage” under “HKEY_LOCAL_MACHINE\Software\Policies\Microsoft\Windows\System” with the value “00000001”. Delete the value or set it to “00000000” to go back to the default Windows 10 “hero image.”
After you perform the registry hack, the Windows login screen will disiplay a flat-color background behind the login prompt. Just press Windows Key + L to lock your PC and check. You don’t have to
Windows 10 won’t hassle you to install an antivirus like Windows 7 did. Since Windows 8, Windows now includes a built-in antivirus named Windows Defender. But is it really the best for protecting your PC — or even just good enough?
Windows Defender is essentially the latest version of Microsoft Security Essentials, a free antivirus program Microsoft offered for Windows 7. Now it’s built-in, ensuring all Windows 10 PCs have some baseline level of antivirus protection.
Is Windows Defender Good Enough?
Antivirus is already running out of the box. Windows Defender automatically scans programs you open, downloads new definitions from Windows Update, and provides an interface you can use for in-depth scans.
But how good is this? Well, truth be told, Microsoft’s antivirus is a bit behind the others when it comes to
Windows 10 comes with the Microsoft Solitaire Collection, a solitaire game that requires you to watch 30-second-long full-screen video advertisements to keep playing. Ad-free solitaire costs $1.49 per month or $9.99 per year. That’s $20 per year if you want both ad-free solitaire and ad-free minesweeper. But there’s a better way.
Microsoft has jumped on board the “free-to-play” bandwagon, which means these games are no longer actually free but have become quite expensive. Microsoft is now making money by nickel-and-diming players with in-app purchases. That helps explain why Candy Crush Saga is automatically installed on new Windows 10 PCs, too.
Solitaire and Minesweeper Have Gone “Free-to-Play”
WIth Windows 8, Microsoft removed the old desktop Solitaire, Minesweeper, Hearts, and other games from Windows. No games were included with Windows 8, but you could download the Microsoft Solitaire collection and Microsoft Minesweeper from the Windows Store for free.
With Windows 10, Microsoft includes the Microsoft Solitaire Collection app out-of-the-box. But they’re not doing this out of the kindness of their hearts. This Solitaire game will show you banner ads as well as full-screen video advertisements, making money for Microsoft.
Opting out of those ads requires a $1.50 per month or $10 per year fee, and that’s just for
Windows 10 includes a variety of universal apps, and there’s no easy way to hide them from the “All Apps” view in the new Start menu. You can uninstall them, but Microsoft doesn’t allow you to easily uninstall them in the usual way.
You probably don’t want to do this. These apps take up very little space on your device so it’s best to just ignore them if you don’t want to use them. But, if you really want to uninstall them, you can. If you’ve already uninstalled included apps, you can get them all back with a single command.
Uninstall the App Normally
Some apps allow you to uninstall them in the normal way. Just right-click an app in the All Apps list in the Start menu and select “Uninstall”. (On a touch screen, long-press the app instead of right-clicking.)
This trick appears to work for the included Get Office, Get Skype, Get Started, Microsoft Solitaire Collection, Money, News, Phone Companion, and Sports apps. You can also uninstall bloatware apps your PC manufacturer has installed using this trick. However, Microsoft’s other included Windows 10 apps can’t be removed in this way.
Use PowerShell to Uninstall Built-in Apps
You can uninstall most of the built-in apps — even ones that don’t normally offer an “Uninstall” option — with a PowerShell cmdlet. This trick won’t allow you to remove a few of the most important built-in apps, including Cortana and Microsoft Edge. If you try, you’ll see
Cortana is one of Windows 10’s most visible new features. Microsoft’s virtual assistant makes the leap from Windows Phone to the desktop, and there’s a lot you can do with it. It isn’t just a voice assistant either — you can also type commands and questions
Open Cortana to see information it thinks you might care about. Cortana provides a lot of passive information, too, even notifying you when you need to leave to make an appointment on time.
If you can’t use Cortana yet in your country, there’s a way to enable Cortana anywhere in the world.
Set Reminders for Times, Places, and People
Cortana has a powerful built-in reminder feature, but there’s more you can do with these reminders than simply getting a reminder at a specific time.
Use the Reminders icon or say “Remind me” to get started. You can create a reminder and have Cortana remind you about something at a specific time, when you get to a specific location, or when you talk to a specific person. You can also just say something like “Remind me to take my pill at 8pm” or “Remind me to buy milk when I get to [name of a store]” to instantly create a reminder.
Use Natural Language Search
Cortana supports natural language search for files on your computer. For example, you can ask Cortana to “find pictures from August” or
Now that Windows 10 is available for public download and installation people have more questions than ever about the new version of Windows. We’ve rounded up the questions we get most frequently here at How-To Geek and compiled them to help you get up to speed about Windows 10.
For all our curious readers, neighbors, and people searching for more information about Windows 10 we’ve rounded up to most frequently asked questions we’ve come across here for your convenience.
Is Windows 10 Really Free?
There has been significant confusion regarding the pricing (or lack there of) of Windows 10 over the last year. Don’t be ashamed if you’re confused, Microsoft themselves changed their story regarding the upgrade and pricing schedule more than a few times during the development and beta testing of Windows 10.
For a huge number of people Windows 10 is really, truly, free-as-in-beer free. If you are currently running any legitimate (non-pirated) version of Windows 7 or Windows 8.1 you will be upgraded for free to an equivalent version of Windows 10. Windows 7 Home/Basic/Premium users and Windows 8.1 users will be upgraded for free to Windows 10 Home. Windows 7 Professional/Ultimate users and Windows 8.1 Pro users will be upgraded to Windows 10 Pro.
You’ll note we didn’t say Windows 8; if you have a Windows 8 machine you first need to
Few people noticed at the time, but Microsoft added a new feature to Windows 8 that allows manufacturers to infect the UEFI firmware with crapware. Windows will continue installing and resurrecting this junk software even after you perform a clean-install.
This feature continues to be present on Windows 10, and it’s absolutely mystifying why Microsoft would give PC manufacturers so much power. It highlights the importance of buying PCs from the Microsoft Store — even performing a clean install may not get rid of all the preinstalled bloatware.
WPBT 101
Beginning with Windows 8, a PC manufacturer can embed a program — a Windows .exe file, essentially — in the PC’s UEFI firmware. This is stored in the “Windows Platform Binary Table” (WPBT) section of the UEFI firmware. Whenever Windows boots, it looks at the UEFI firmware for this program, copies it from the firmware to the operating system drive, and runs it. Windows itself provides no way to stop this from happening. If the manufacturer’s UEFI firmware offers it up, Windows will run it without question.
Lenovo’s LSE and Its Security Holes
It’s impossible to write about this questionable feature without noting the case that brought it to public attention. Lenovo shipped a variety of PCs with something called the “Lenovo Service Engine” (LSE) enabled. Here’s what Lenovo claims is a complete list of affected PCs.
When the program is automatically run by Windows 8, the Lenovo Service Engine downloads a program called the OneKey Optimizer and reports some amount of data back to Lenovo. Lenovo sets up system services designed to download and update software from the Internet, making it impossible to remove them — they’ll even automatically come back after a clean install of Windows.
Lenovo went even further, extending this shady technique to Windows 7. The UEFI firmware checks the C:\Windows\system32\autochk.exe file and overwrites it with Lenovo’s own version. This program runs at boot to check the file system on Windows, and this trick allows Lenovo to make this nasty practice work on Windows 7, too. It just goes to show that
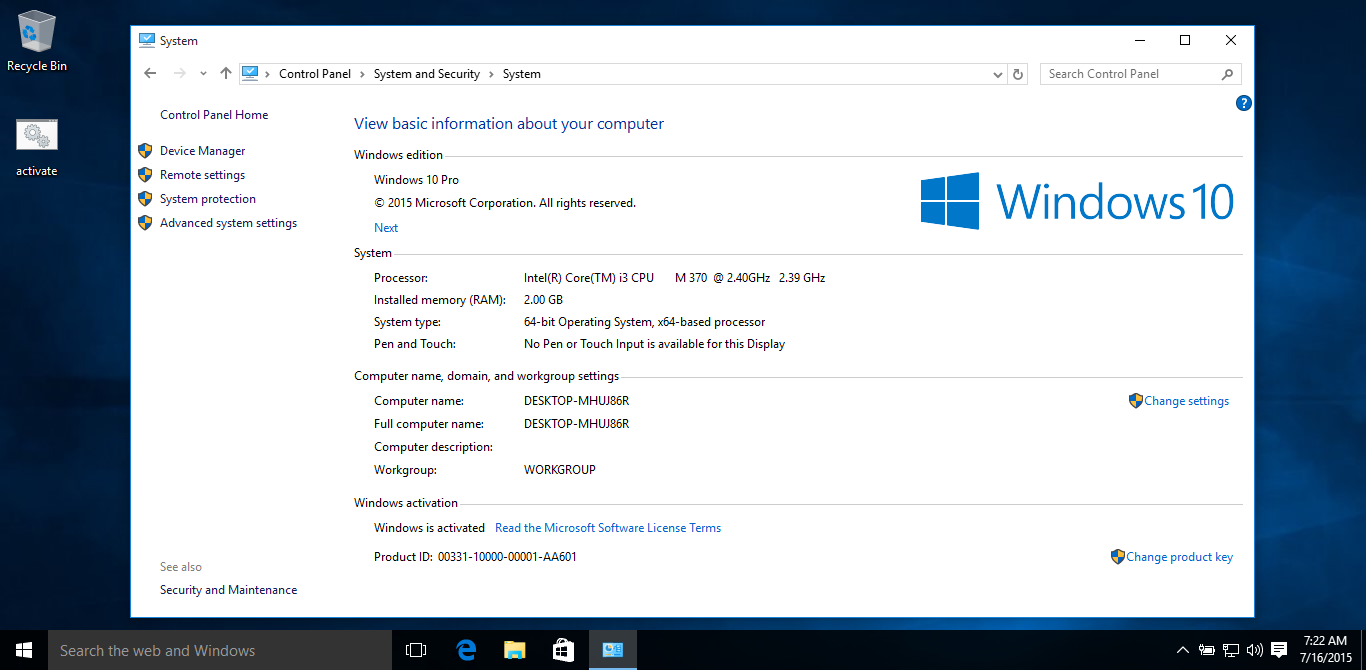
The free Windows 10 license you receive is tied to your PC’s hardware. You’re still allowed to use Windows 10 on that same PC even after changing its hardware, but that may not be clear. Microsoft won’t give you a product key.
Microsoft really doesn’t want to explain how the activation process works. It doesn’t want to give pirates too much information, but that does make the licensing process confusing for legitimate users, too.
How Windows Licences and Activation Usually Work
The free Windows 10 license works very differently from previous Windows licensing systems. These all required a product key. Even modern Windows 8 and 8.1 PCs — and new PCs that come with Windows 10 — have a Windows product key embedded in their UEFI firmware. If you buy a new copy of Windows 10 — for example, to install it on a PC you’re building yourself — you’ll also have a product key.
In this case, the product key would always serve to activate Windows. But Microsoft hasn’t been handing out Windows 10 product keys to upgraders. There’s no way to find your Windows 10 product key if you’ve upgraded for free — you just don’t have one.
How the Free Windows 10 License Works
The free Windows 10 license Microsoft is providing to upgraders works differently. Microsoft won’t issue you a Windows 10 product key. Instead, when you perform an upgrade from within Windows 7 Service Pack 1 or Windows 8.1, the upgrade process registers a unique ID associated with your PC’s hardware on Microsoft’s Windows activation servers.
In the future, whenever you install Windows 10 on that same PC, it will automatically
Many users who performed a clean install of Windows 10 build 10240 cannot activate it. That is because Microsoft has disabled the online activation until the end of July 2015. If you are interested in activating Windows 10 build 10240, here are a few simple steps for you to do that without using any cracks, hacks or third party software.
If you are using genuine Windows 7 or Windows 8.1 OS in your computer, you'll be able to upgrade to Windows 10 for free. The free upgrade will be done with the help of a small app "Get Windows 10" which sits in Taskbar notification area. It'll automatically download Windows 10 setup files on your computer and will notify you once the download completes. After that you can install Windows 10 in your computer.
But there are many users who don't have "Get Windows 10" app in their computers. To fix the issue, we have posted a troubleshooting guide at following link:
But if you still can't see the app and its icon, then you'll be unable to take advantage of free Windows 10 upgrade offer. Fortunately, Microsoft has released a Media Creation Tool to download Windows 10 setup ISO files as well as to create installation media such as bootable USB drive or DVD.
This tool will help you in downloading the correct Windows 10 edition and type such as 32-bit or64-bit.
You can download the official tool from following link:
After downloading the setup files of Windows 10 using this tool, you can upgrade your existing OS to Windows 10 or you can create bootable USB drive or DVD to install Windows 10 later. You can also save the setup files in offline ISO file format if you wish.
Once you create installation media or save ISO file, you can use them to install Windows 10 in other computers as well.
NOTE: If you upgrade your existing Windows 7/8.1 to Windows 10 using this tool, then
NOTE: If you are having problems with "Get Windows 10" (GWX) app and its icon and can't upgrade to Windows 10, follow the METHOD 5 given at the end of this topic.
Recently we told you about the new "Get Windows 10" app released by Microsoft for Windows 7and Windows 8.1 users. This new app will help Windows 7 and 8.1 users in upgrading toWindows 10 for free when Windows 10 is released to public on July 29, 2015.
The basic idea behind releasing this app is nice as it'll automatically download Windows 10 setup files and will help users in installing Windows 10 easily without worries. This app also checks your computer for compatibility issues and lets you know whether you can upgrade to Windows 10 or not.
But there are many people who are happy with Windows 7 or Windows 8.1 and they don't want to upgrade to Windows 10. For such people this app and its icon present in Taskbar notification area might become annoying. That's why we posted an exclusive tutorial to disable or remove this Windows 10 upgrade app and its Taskbar icon:
Now there is another issue appearing for several users. Many Windows 7 and 8.1 users who want to upgrade to Windows 10, are not getting this app and its icon in Taskbar. Since they can't see the Windows 10 upgrade icon, they are unable to reserve their Windows 10 upgrade.
We have received many comments and emails from our readers who are not getting "Get Windows 10" icon in Taskbar system tray. They want to install the app but they have no idea how to do it.
That's why today in this tutorial, we are going to cover all methods and information which will help you in understanding why are you not getting Windows 10 upgrade app and its icon in Windows 7 and Windows 8.1 Taskbar and how can you show it in your system.
So without wasting time lets start the tutorial:
Important Things to Know About "Get Windows 10" App and Icon Availability:
First of all lets tell you about some important points which might be causing the missing "Get Windows 10" app and icon in your computer:
1. Your Windows must be genuine and activated. If you are
By default, Windows 10 is set up to share your Internet connection over Wi-Fi. This is a nifty feature if you want it, and a dangerous one if you don’t. To be on the safe side, you should probably just disable it right from the get-go.
Open the Settings app from the taskbar or Start Menu, then open Change Wi-Fi settings and click Manage Wi-Fi settings. Now, uncheck all the boxes under “For networks I select, share them with.”
You may also want to slide the toggles to off underneath “Connect to suggested open hotspots” and “Connect to networks shared by my contacts.”
Customize the Start Menu
Ahhhhhhhhhhh! The Start Menu is back!
It’s OK, you can get excited. We won’t judge. Once you get past the simple fact that the Start Menu is there, however, it’s time to begin making the most of it.
We published a big post on Wednesday about customizing the Start Menu, and we highly suggest that you check it out. In it, you’ll learn how to add and remove tiles, how to enable and disable live tiles, how to resize the entire Start Menu and how to change its appearance.
Manage restarts
I switched from Windows to OS X as my primary desktop operating system eight or nine years ago, though I still used both for a while. Now, the only regular interaction I have with Windows (aside from testing it for BGR) is when friends and family call me for help because something is broken.
This happens all the time. As great as Windows 10 is compared to Windows 8, I don’t expect these calls to end anytime soon. And of course, four out of every five frantic calls I get are resolved with the same fix: A restart.
People… when something goes wrong with your computer, restarting is the first thing you should try. In fact, you should be restarting your computer regularly if you don’t shut it down each night. That said, automatic restarts after software updates that are unexpected can be very annoying. So here’s an important setting to tweak:
In the Advanced update section within Settings, select Advanced Windows Update options. Then, in the drop-down menu at the top, choose “Notify to schedule restart.”
This way, your computer will still restart regularly whenever updates are installed, but you’ll get a warning first.
Meet the Action Center
Microsoft’s spin on Apple’s Notification Center is called the Action Center. It might not be the most original feature in the world, but it’s quite useful and we listed it among the five best fixes for annoying problems in Windows 8. Live tiles are nifty, but having one location for all of your notifications is a welcome change.
Seriously, get to know the new Action Center.
Don’t let notifications own you
As great as the new Action Center is, however, think of it like an iPhone. If you give every app carte blanche access to notifications, you’ll lose your mind. Instead, you want to analyze things on a per-app basis and choose which apps can pop up notifications and which should stay quiet.
In Windows 10, you can adjust notifications settings by clicking the notifications icon in the system tray. The click All settings, followed by System and then Notifications & actions. Here, you’ll be able to pick and choose which apps can display notifications and which ones cannot. You’ll also be able to tweak a few additional settings pertaining to notifications.
Windows 7 and Windows 8 users might have noticed a new Windows icon in their system trays that when clicked, will open a dialog that introduces Windows 10 and determines if you’re eligible for a free upgrade. Here is how to remove that icon and dialog permanently.
We’re all aware of Windows 10 here at How-to Geek. We can’t go a day now without hearing about its pending arrival, which it turns out is July 29. In truth, we can’t wait for Windows 10 because we feel it finally fixes most of Windows 8’s ills and we believe it is going to be a must-have upgrade for all current Windows users.
Microsoft obviously believes this is true as well because they’re offering it as a free upgrade to most qualifying current Windows owners. They’re also pulling out the stops when it comes to making you, the average everyday Windows user, aware of its existence.
Unzip the batch file (called win10fix_full.bat) and put it somewhere convenient (like on your desktop)
Right-click on the batch file and choose Run as administrator then click Yes.
Read the instructions while making your way to the main menu.
When you get to the main menu you will be presented with five options. Start off by choosing option 1 (by pressing 1). This will check that you have the relevant updates applied. If you don't have the relevant updates installed then you need to exit the batch file (pressing 5) and run Windows Update before running the batch file again.
If everything checks out on the update front, you have three options for fixes. I suggest working through them one at a time.
If the icon appears then give yourself a pat on the back. If you run all three options and the icon still nowhere to be seen then at least you can say you tried.
Some cautions and caveats worth bearing in mind:
I've checked the batch file and run it on a number of test systems and seen no harmful side-effects. However, the cautious among you might want to load the batch file into a text editor and check it out.
If any of the instructions above leave you scratching your head, this fix is not for you.
If running this batch file breaks something on your system, then you're on your own. Have a backup, because if things go wrong, not being able to upgrade to Windows 10 is going to be the least of your problems
Even if you don't sign up to get Windows 10 it will still be made available as a download, although you might not get it on day one. If you're not in a rush, then there's no need to bother with the whole 'Get Windows 10' signup process.
While the launch of Windows 10 got mostly good reviews from the media and the general public, most did mention that the operating system still has some bugs. Microsoft is reportedly planning to release a bigger update very soon that will deal with at least some of these issues.
According to The Verge, the update has the label 'Service Release 1' (SR1) and will be released to Windows 10 users sometime in early August, and perhaps as soon as next week. Again, SR1 won't add any new features; it will simply try to stamp out some of the bugs that have been discovered in Windows 10.
The story adds that Microsoft is working on a larger Windows 10 update for October that will add some new features, including the previously revealed Messaging app and support for Chrome-like extensions in the Microsoft Edge web browser. Members of the Windows Insider program will get first crack at checking out these new features sometime in the coming weeks. Microsoft is also planning to release updates that could improve battery life in Windows 10 laptops.
The Start menu became one of the more divisive issues for Windows 8, which removed it entirely in favor of the Modern UI Start screen. Some people loved the new interface; many hated it. Microsoft brought the menu back in Windows 8.1 and has revamped it for Windows 10. And it’s...pretty good.
The Start menu works much more fluidly in Windows 10. It’s fast, all your apps are present on the menu, and search is really good. Still, for many, the new live tile presentation in the right column of the Start menu is pointless. For me, I don’t really use any modern apps, so it’s just wasted space for the most part and I suspect a lot of people feel the same way.
Fortunately, most of the classic Start menu apps for Windows 8 work just fine for Windows 10. Start8, our favorite app, has been updated to Start10 (though unfortunately, it’s a paid upgrade). If you prefer free, Classic Shell still works beautifully. If you prefer your Start menu with the functionality of the Windows 7 Start menu, any of these apps can get you back to it. And don’t worry. The new search functionality will still work.
If you don’t want to use an extra app, there are still a few things you can do to tweak your Windows 10 Start menu to your liking:
Adjust the size of the live tile area by dragging the right edge of the Start menu while it’s open. You can make up to four columns wide. You can also drag the top edge to resize the whole menu.
Make the Start menu full screen by going to Settings > Personalization >Start and turning on the Use Start full screen switch. This is much like using the Windows 8 Start screen.
Right-click any live tile and choose Turn live tile off to make it a regular tile.
Unpin all the tiles on the right side of the Start menu (right-click and choose Unpin from Start) to make a single column Start menu with no live tiles.
With the right tweaks, there’s no reason you can’t fall in love with the new Start menu.
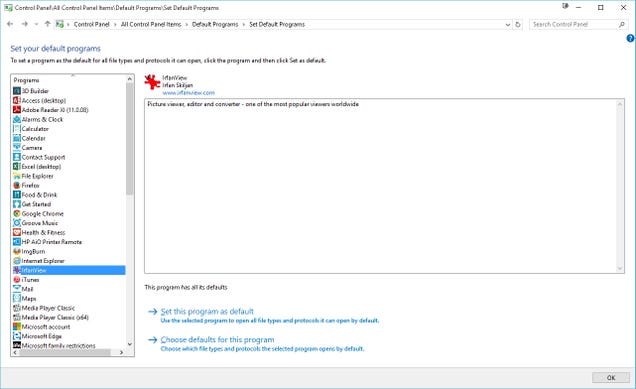
Change Your Default File Associations
During the Windows 10 upgrade, a lot of my default programs got reset even though I told Windows not to do it. For example, it went ahead and associated all picture files with the built-in Photos app even though I removed that check box during installation. It’s easy enough to fix, but it is an inconvenience.
If you find your default programs have been changed you can change them in a couple of ways:
Change the default program for a single extension on the fly. Right-click a file, point to Open With, and click Choose another app. This lets you choose an app to open that file. Select the Always use this app option to permanently associate the program with the extension.
Change a program to open some or all available extensions. In the search box, find and open Default Programs. This opens the window shown above. Pick a program on the left to see its current associations. You can set the program as the default for all file types it can open or choose specific file types and protocols with which to associate the program.
Remove the Search Bar and Task View Button From the Taskbar
The new search bar on the Windows taskbar can be pretty handy, but it takes up a good bit of real estate on the taskbar. Plus, you can search just as well without it. Even with the search bar hidden, you can hit your Windows key and start typing to perform the same search. To hide the search bar, right-click anywhere on the taskbar and point to Search (or, if you’ve enabled Cortana, Cortana). Choose Show Search Icon (or Show Cortana Icon) to remove the search box itself and just show an icon you can click to open up Cortana, or choose Hidden to remove them from the taskbar entirely.
On that same Taskbar context menu, deselect the Show Task View button option to remove that button from the taskbar. You can still get the same Task View by hitting Windows+Tab.
Remove “Quick Access” From File Explorer
Quick Access is the new area in File Explorer that replaces the Favorites section from Windows 8. The video above, from Windows Central, is a pretty good rundown of the feature. Quick Access can actually be pretty handy, and may not seem like an annoyance to some, but if you’d rather not see all your most recently used folders cluttering up Explorer, you have a few options.
First, you can change the default File Explorer view from Quick Access to This PC. Just open File Explorer and head to View > Options, and under the General tab, change “Open File Explorer to” to This PC. Handy!
If you want to get rid of Quick Access entirely, the process is a bit more complicated. You canread about in full over on Windows Central. It does take several steps, a couple of which require you to make registry changes, so, if it’s not bugging you that much, you may not want to bother. If you’d like to banish Quick Access, though, create a system restore point or make a quick backup of your registry, and go for it.
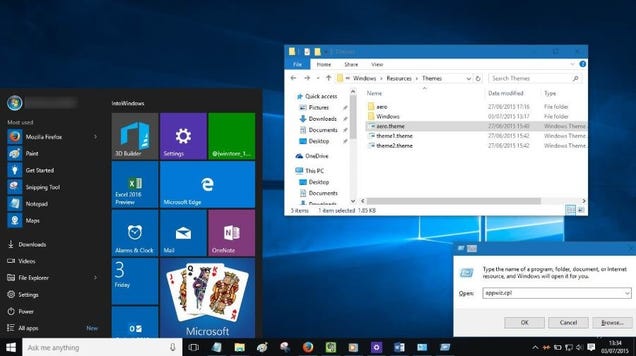
Change the Boring Title Bar Colors
While Windows 10 does not let you change the default color of the title bar for windows from their default white, you can change them with a little mild hackery.
As Into Windows points out (and hit up that link for the full instructions), all you have to do is make some text edits to a couple of styles files so that Windows uses the accent color (a value you can change) for the title bar. After you make the edits, you can change the accent color any time you want to change your title bar color. Do do this, just open Personalization > Colors, turn off the Automatically pick an accent color from my background option, and choose any color you like.
Disable Windows 10 Updates
Windows 10 automatically downloads and installs updates without any input from you. Overall, this is likely a good thing, given how many people out there are bad at keeping things updated. This policy can cause trouble, though, especially if Windows downloads driver updates that end up causing you trouble.
First and foremost, some people are reporting difficulty activating Windows 10 once it’s installed. The bad news is there’s really nothing you can do on your end to fix it. The good news, however, is that this issue usually resolves itself after a few minutes.
Chrome is crazy
Chrome browser users are running into a bunch of problems with bogging and slow-downs, especially which performing heavy tasks like streaming video.
We’ll have to wait for Google to iron out the bugs but in the meantime, killing all your extensions will help a bit. If that doesn’t help, try reinstalling Chrome.
Where are my favorites?
The new Edge browser is sooooo much better than Internet Explorer. To be fair, it would be difficult to make a browser worse than IE, but Edge is a nice simple browser that’s quick and clean.
But where are your favorites?
Click the … button to open the menu and then click Settings. Scroll to Import favorites from another browser, and then choose your old browser and click Import.
Folder fail
According to some users, there actually is one area where Windows 8 is better than Windows 10: The email app in Windows 10 doesn’t allow people to create subfolders when organizing their email.
For most people, this is hardly an issue. Unfortunately for people who do have an issue with it, there’s no fix for the time being.
Connectivity complaints
A number of Windows 10 users are complaining that their Wi-Fi is cutting out and it won’t reconnect. This is actually a pretty common problem across all versions of Windows, and the fix is the same as it is for Windows 8, Windows 7, and every other version out there: Reboot.
Some users have said that disabling Wi-Fi sharing helps make Wi-Fi connectivity a bit more stable.